I attended Burning Man 2016. One morning at Sunrise I put my Canon 5d mk ii on a tripod and snapped away for almost an hour. This gif condenses all the action into one short moving image. You can learn how to create a gif in photoshop with this post. You can see more of my Burning Man 2016 images on my Flickr page.
Tuesday, September 6, 2016
The Magic Burning Man Sunrise
I attended Burning Man 2016. One morning at Sunrise I put my Canon 5d mk ii on a tripod and snapped away for almost an hour. This gif condenses all the action into one short moving image. You can learn how to create a gif in photoshop with this post. You can see more of my Burning Man 2016 images on my Flickr page.
Monday, July 6, 2015
Sunrise and Sunset Photography Tips
![]() |
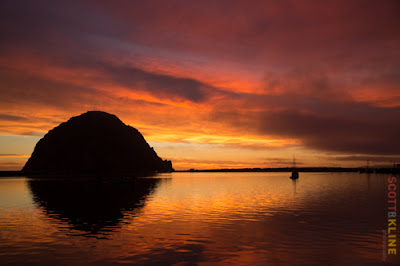
| This shot from Morrow Bay at sunset was taken after about 90 minutes of observing the sunset. Hand-held. ISO 160, f4.5, 1/100 sec. |
Sunrise and Sunset photos, have always been fun for me. They give me a break from my regular work and I get some beautiful shots. I recently completed a road trip through central California and with a little planning got some breathtaking sunset shots. With that in mind, here are some tips for getting the most from your shots at sunrise or sunset.
Plan Your Shot
Find spots that you think will work well. Face west at sunset or east at sunrise. Put features like buildings, boats and power lines in the shot. To me a horizon with beautiful clouds turning colors is nice. Better is some silhouette or building with lights. See my previous blog about night photography and architecture. You can use an app like Sun Seeker to see where the sun will be at specific times of the day.
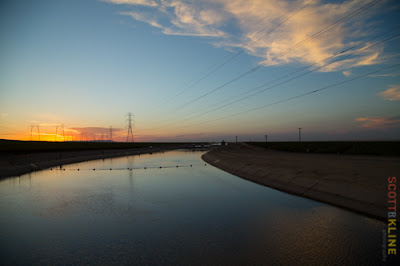
On my trip, I planned to be near the California Aqueduct near sunset. I arrived a little early. Shot some other photos and decided to include the electrical towers in the shot for interest. I hung out from about 30 minutes before sunset until almost an hour after.
![]() |
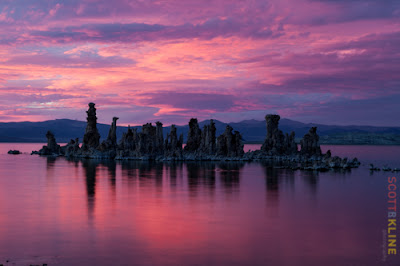
| I used a Tripod for this sunset in Mono Lake. Hung out in this spot for 4 hours. The sunset was great for about three minutes. ISO 100, f22, 3 second exposure. Canon 5D Mk II |
Bring A Tripod
This is especially useful if you are adding architectural elements with electrical lighting into shot. You also don’t have to adjust your ISO and lose quality of the image when you can’t handhold at the lower shutter speeds. If you have to hand-hold and you are shooting more distant items you can help yourself by using a more open f-stop like f4.0. Depending on your camera, you can boost your ISO as needed.
![]() |
| This sunset shot at the California Aqueduct incorporates the power lines and towers as well as the clouds for graphic elements. Handheld. ISO 100, f6.3 1/125 seconds |
Hang Around
The light changes dramatically during a good sunset. Often going from golden, to orange to purple. If you are lucky, you will get all three. So hang around from about 30 minutes before the sunset until 60 minutes after. Even longer if you are getting good stuff and can use a tripod. The Morrow Bay and Mono Lake shots went through this full spectrum.
Embrace Clouds
Look for cloud patterns. You can add a lot of drama to a shot by including clouds in your shot. The shot of Morrow Rock was very dramatic because of a break along the horizon that resulted din the sun shining under the clouds. Of course a full clouded sky doesn’t do you any good. But in my experience, clouds often break up as the sunset approaches and the wind dies. The shot at Mono Lake was a great example.
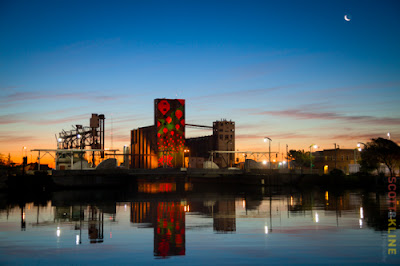
Water Doubles Your Pleasure
Sunsets with water in them really work well. The water reflects the sky and can add extra elements of shoreline or riverbank. Longer exposure can make the waves go away as well.
You can check out lots more of my photos on my Flickr gallery of sunsets.
Wednesday, June 11, 2014
Professional and Corporate Headshots - SRK Headshot Day Video
This video outlines our professional headshot day process. It's a great way to update your profile photo on LinkedIn, Facebook or other social media. Also a great service for small companies wanting to get employee photos for their about or team page. Learn more and sign up at SRKheadshotday.com.
Sunday, April 6, 2014
Studio Portraits Using Black or White Seamless Backgrounds
![]() |
| Dr. Hibret Benjamin is a dentist with a great smile. She was shot here with a single light using a white seamless background. |
We go to various locations for our open Headshot Days. Corporate
Headshot Days locate at company locations where we shoot several employees in a
day. I use seamless because it is most portable. Nine-foot wide rolls allow me to get farther from the
background. I use Savage 66-12 for
Pure White and 20-12 Black. I
have two separate Background Support Stands for each backdrop so I can roll one
up to reveal the other. My favorite is the Westcott
that is 10.5 wide or seven feet wide depending on how many crossbars are used.
For the white background, I only use one light. I use the
largest source I can for a key light. My preferred is an 86” Extreme Silver PLM Umbrella with
diffuser from Paul C Buff. This
is place on a Paul C Buff Einstein
E640 flash unit fired with Cybersync wireless triggers. I like the way this
light wraps around the subject softly filling in the shadows. It also leaves a
beautiful round catch light. For the white shots I usually have the light
straight behind me and directly on the subject.
If I need it, will put a diffused light on the white
background. But I always want to make sure the background is not blown out and
is in the top quadrant of white on the histogram. If you blow it out, pixilation happens around the hair. This
looks extremely unnatural and detracts from the photos. When I process the
photos in retouching, I replace the white background with pure white. So any
white showing through the hair needs to be as white as possible in the original
shot without pixilation.
For the black background, I change the light to make it a
little edgier. I move the key
light off axis to one side by a few feet. I add a gridded rim light from behind
the subject on the opposite side of the key light. Also, I put a light on the
background. I grid this and throw a diffuser on it to make it just bright
enough to create a gradient around the subject. This is especially important if
they are wearing darker colors or have dark hair. It separates them from the
background. When I retouch, I try to even out the black so it goes pretty dark
on the edges. Another tip is to get the subject away from the background so
that it is somewhat out of focus. Paper backgrounds have natural insistencies
that can be attractive if they are out of focus.
Saturday, November 2, 2013
Suitcase Diaries
What would happen if two young ladies survived the apocalypse? Wandering around one day they find a suitcase filled with clothes and wonderful mysterious artifacts from a time they have long forgotten. This was the scenario for a fashion photography collaboration.
Photography was shot by Scott R. Kline at Firehouse 8 in San Francisco, CA. Mostly natural light as used in these photos fro skylights and reflectors. Occasionally light was augmented by Alien Bees lighting with soft boxes.
Clothing was provided by Danette Scheib and LemonTwist a San Francisco women's clothing maker. Make-up by Andrea Marie Ortega. Models are Danielle Wood and Lizzie Gunn.
This series was published by Spirit and Flesh Magazine website.
Monday, May 27, 2013
Shooting with a White Seamless Background and Natural Light
![]() |
| For Children's Health Council, March 2013. |
Richard Avedon popularized this style of white background shooting with his photos of the American West in the late 1970s. In these photos Avedon typically found a shadowed area next to a barn or other building. In this way there was bright light all around to fill the photos, but the subject, being in shade had soft shadows and even light.
Similarly, I use a silver-topped canopy tent to create a
shaded area. In back of the tent I drop a white seamless background. On a sunny
day, the sunlight hits the top of the tent creating a nice soft light. Light
seeps in from every side of the tent creating a catch light in the eyes of
the subject and even light all around.
Of course, I do this in color rather than in black and white that does
create color temperature differences between photos taken at different times of
the day. Also, within photos I have found that the feet might be a cooler color
temperature while the face is warmer. I attribute this to the surrounding
outside the tent. If there agree shaded areas instead of refracted sun, they
can throw a more blue light.
The white seamless needs to be exposed as close to white as
possible without blowing it out.
Blowing out the background can create a halo around the subject,
particularly in the hair where it looks unnatural or parts of hair partially
disappear.
I like to replace the background with pure white later in
post. This is easier if the white was originally close to 256 and more
separated from the subject colors. A subject wearing white or white stripes can
sometimes blend with the background, requiring a more specific selection rather
than a global.
One technique that gets it right most of the time is to go
to the channels layer of photoshop and duplicate the blue channel. Then using levels, you can drag the
sliders until the subject goes to black and the back ground goes to white.
Usually the white slider only has to come down to 240 or so. You bring up the
black slider as close as you can without seeing any grey sneak into the
background. If you have to you can paint in black on the subject. When
everything looks solid, you can save the selection and create a mask on a new
layer I photoshop. Then fill the layer with white. I find it help to soften the
edge of the mask using the refine edge tool. Usually a feather of 2 works well.
If you want to get back some stray hairs, you can also use the masking tools to
paint in a blend around the head.
Have fun with this. Everyone loves their photo on a white
background. It also looks great on most websites because of their white
backgrounds. I recently shot a series of photos using this technique for
Children’s Health Council. You can see more of those photos on my other blog scottrklinephoto.com/blog.
Tuesday, February 5, 2013
Winemakers to Watch
![]() |
| Matthew Rorick of Forlorn Hope uses a thief to get a taste of a 2012 Barbera on January 13, 2013. |
I had a great time photographing four California Winemakers for the San Francisco Chronicle. The four were all a pleasure to work with. On four different mornings I headed out for a shoot. Two in Napa, one in Sonoma and one in Paso Robles. Even in winter I found the vineyards beautiful. THe start graphic elements of the bare vines made a great backdrop. I also went to each winemaker's winery for additional photos. The articles ran in the Food & Wine Section of the Chronicle on Sunday, February 3 under the title Winemakers to Watch 2013.
Technically, this was a fun shoot. Four different people on four different days. To keep some consistency, I shot everyone in the vineyards starting at 8:30 AM. I tried to use the morning light as a rim light and then use an Alien Bees B800 with a softbox as a key. The other winery shots can be seen on my other blog at scottrklinephoto.com/blog.
![]() |
| Katy Wilson, owner and winemaker at LaRue Wines stand above barrels which include some of her Pinot Noir at Kamen winery near Sonoma, Calif., on Sunday, January 20, 2013. |
The shot of Katy Wilson, above, was in a much bigger space. Similarly, there was an open truck door letting some light in the space. But I augmented the ambient with two speedlights.
![]() |
| Tadeo Borchardt has been winemaker for Neyers Vineyards since 2004. These vines produce Merlot at the Neyers Ranch in Conn Valley near St. Helena, CA. January 16, 2013. |
Subscribe to:
Posts (Atom)